I made this tutorial because I have not found one that helps you cut the bucket for the wheel. I think that is why people use the cake carrier lid. After cutting myself on the first wheel, I knew there was a better day. This process has risks because I use a soldering iron with a sharp blade, a knife and a drill. If you do not feel comfortable using these tools try to find someone else to make the wheel for you.
Tools
Soldering iron with knife blade
5 gallon bucket
Ruler
Permanent marker
Painters Tape
Rollerblade wheel
Zipties
Knife
Assorted Files
Sandpaper or rubber sanding block
Drill with assorted drill bits.
Paper towels
Table (do not use anything nice)
Where to buy
Soldering iron: I purchased a soldering iron kit at Walmart, but I have seen then them at Hobby Lobby and Michaels. Do not forget your coupons. They might be in the wood section or jewelry. This is one from
Amazon.
5 gallon bucket:
Home Depot and
Lowe’s has the best price on buckets. They are not the thickest wheels but are good.
You might be able to get free buckets at a food establishment like at the bakery at the grocery store or a doughnut shop. Stay away from buckets that were used with cleaning products.
Tips
Bucket thickness
Buckets come in different thickness (mil). Look at the bottom of the bucket and it should have it there. On my first wheel it is 100 mil. This is the thickest bucket I have seen and I have no sagging. The buckets at Home Depot and Lowe’s are 70 mil. I have researched online and you can get a 5 gallon food grade buckets. They are 90 mil but they cost more in shipping than the bucket so asking food establishments might be the only option.
Making the cut
This is what the soldering iron looks like with the blade on. Make sure you preheat the soldering iron before you make the cut. Make sure the cord is not in the way of the tip or other objects. Also make sure your outside or have a fan on in the area to vent the fumes from the plastic. It gets stinky!
1. Measure around the bucket 6 inches every few inches around and make a mark with the permanent marker. Once you have it marked you will put the painters tape on the top of the mark around. This will be your guide when you are cutting it.
2. With your painters tape you will tape the top of the line like the photo below.
3. Get some paper towel and place it close by folded up some. Once your soldering iron is hot enough, slowly start the cutting. I moved the blade up and down but do not go down all the way or the shaft of the iron will melt the plastic and it becomes messy. Have the fan on or you will get smoked out from the burning plastic. I put some pressure when I am cutting but try not to rush it or you might break the tip.
When the knife is covered in the plastic I like to clean it. Get the paper towel on the edge of the table and wipe the blade. Do not keep it on long or it might catch on fire. The brown areas are the burning part.
Another cutting action shot
Cut apart!
The wheel
4. The edge of the wheel is not ready so we will have to file and sand it down
I use a Leatherman’s file and knife. Be very careful with the knife, they are sharp!
Move in a backwards motion to get the big chunks off. If you feel you cannot do this step then just stick with the file.
I switched over to the file and went around the wheel
Then I went for the rubber sanding block. I love using these because it can fit inside of the lip and get it very smooth. You can see the difference this step does on the edge. Make sure you feel around the edge and get all sharp areas.
5. This is the time you can position the holes for the wheel. You can drill out the middle first. I used a small drill bit then moved up in size till I had the diameter of the metal part of the skate wheel. You make it big so you can get the screw on tight. Also make sure it is not that big so you do not have space to put the zipties.
You do not need to use that small of a drill bit.
6. Put your roller skate wheel in the middle and trace around the edge. Then make a mark to show where to place the holes on the line. You can see that below.
You have your line around the wheel and you only need to put 3 lines to show the holes. You will be drilling the middle of the wheel, inside of the wheel and outside of the wheel. The pictures below will help. Once you have your holes drilled I used rubbing alcohol to remove the permanent marker.
This is the size of the middle hole and without marker on it. I forgot I made it this big so the other pictures below have it with the maker and smaller hole.
Place the wheel on the bucket and place the zipties in the middle first and make sure it is the right direction to get them closed.
Make the top of the ziptie on the side like on the right or it will be sticking out of the front. Once you have it tight cut off the ends but leave a little on.
The base I made was from
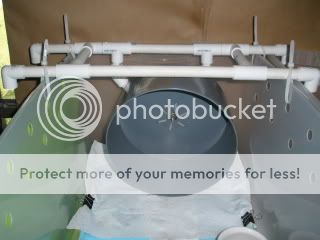
Hedgehog World website. I flipped it upside down and place it on the top of my cage so he would not use the bathroom on the pvc pipe. Now I have a critter nation cage and going to attach it to the bars. I am still keeping the PVC pipe stand when we travel. Below are some pictures of the reverse wheel.

Trying it out but it was during the day so Ace decided he wanted to sleep more